Double exposure on film is exactly what it sounds like: exposing the same frame twice, layering two images on top of each other in a single negative. The results range from subtle ghosting to surreal composites where a portrait dissolves into a forest canopy or a cityscape bleeds through a silhouette. It's one of the oldest creative techniques in photography, and on film it carries a quality that digital simulations never quite capture — because each double is a genuine, unrepeatable event.
The technique itself is straightforward. The magic is in the planning, the exposure compensation, and the willingness to accept that half your attempts will look like mud. The other half, though, will contain frames that couldn't exist any other way.
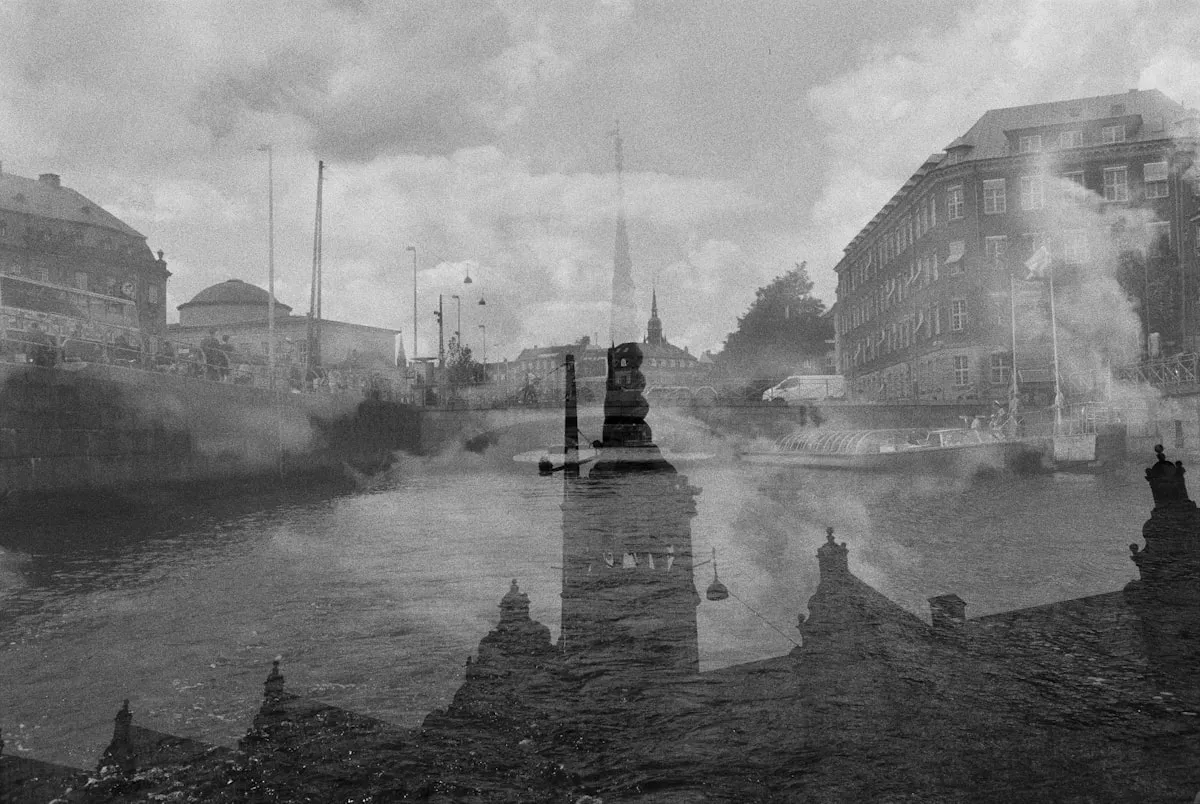
Each double exposure on film is a genuine, unrepeatable event. You commit to two layers without seeing either one first, and what emerges is something neither image could have been alone.
How Double Exposure Works on Film
Film records light cumulatively. Unlike a digital sensor that gets reset between captures, an unexposed frame of film sits waiting in the gate, and any light that reaches it adds to the latent image. Expose it once, and you have one layer. Expose it again without advancing to the next frame, and the second exposure stacks on top of the first. Bright areas from either exposure will register as bright on the negative. Dark areas — where little light hit the film — allow the other exposure to show through.
This is the fundamental principle to keep in mind: light areas dominate, dark areas recede. A silhouette in the first exposure creates a window for the second exposure to fill. A bright sky in the first exposure will overwhelm whatever you put over it in the second. Thinking in terms of light and dark, rather than subject and background, is how you start making intentional doubles instead of accidental messes.
Method 1: The Multiple Exposure Button
Many film SLRs have a dedicated multiple exposure lever or button. On the Nikon FM2, it's a small lever near the film advance. On the Canon AE-1 Program, it's a switch on the bottom plate. The Pentax LX has one too, as does the Contax RTS. When engaged, this mechanism cocks the shutter without advancing the film, letting you expose the same frame again.
This is the cleanest method. The film stays precisely aligned between exposures, so the two layers register perfectly. You can compose each exposure deliberately, adjusting framing between shots. Cameras with this feature were designed for it — the mechanism is reliable and won't accidentally advance the film.
Check your camera's manual to find out if it has a multiple exposure capability. If it does, practice with it on a throwaway roll before committing to a serious project. The lever or button locations vary and can be easy to miss if you don't know to look.
Method 2: The Rewind Trick
If your camera doesn't have a multiple exposure button, you can fake it. After taking the first exposure, hold the rewind button on the bottom of the camera (this disengages the film advance mechanism), then cock the film advance lever. The shutter cocks, but the film stays put. Release the rewind button and take your second exposure.
This works on most manual SLRs, but alignment is less precise. The film may shift slightly between exposures, producing a ghost-like offset. Some photographers consider this a feature, not a bug — the slight misregistration adds to the dreamlike quality. Others find it frustrating. Test it on your specific camera to see how much slippage you get.
Method 3: Shoot, Rewind, Reload
For a more experimental approach, shoot an entire roll normally, rewind it, reload it into the camera, and shoot over it a second time. Every frame on the roll becomes a double exposure, with the two layers composed weeks or even months apart. The results are almost entirely unpredictable — you're combining two complete rolls of images with no control over which frames overlap.
A few practical notes on this method: when you rewind the first pass, leave the film leader sticking out of the canister so you can reload it. Mark the position of the film leader relative to the canister with a pen or tape so you can align the starting point approximately. Even so, expect frame alignment to be off by a few millimeters. And because you can't predict the combinations, shoot the first pass with strong compositional elements — silhouettes, high-contrast shapes, textures — that will layer well with almost anything.

Exposure Compensation
This is where most people go wrong on their first attempt. Two full exposures on the same frame equals twice the total light, which means overexposure. To compensate, each individual exposure should be reduced so that the two together add up to one correct exposure.
The standard rule: underexpose each layer by one stop. If your light meter says f/8 at 1/125s for a normal exposure, shoot each double exposure layer at f/11 at 1/125s, or f/8 at 1/250s. Two half-exposures equal one full exposure. This works well when both layers have similar overall brightness.
But the rule isn't absolute. If one layer is predominantly dark (a silhouette against black), it's contributing very little additional exposure to the film. In that case, you might expose the dark layer normally and underexpose only the bright layer by a stop. The dark areas of the first exposure barely affect the total light, so they don't need as much compensation.
This is where experience and experimentation matter. Keep notes on how much you compensated each layer, and review the results carefully. After a few rolls, you'll develop a feel for which combinations need full compensation and which can be looser.
Choosing Your Subjects
The most successful double exposures pair a strong graphic element with a textural or detailed fill. Classic combinations include:
- Silhouettes and textures: Shoot a person's profile against a bright sky for the first exposure. The dark silhouette becomes a window. For the second exposure, shoot foliage, water, architecture, or any texture you want to fill the shape. This is the most reliable approach and produces consistently striking results.
- Portraits and nature: A close-up face in the first layer, flowers or tree branches in the second. The transparency of double exposure creates an ethereal quality where the person seems to merge with the natural world.
- Architecture and sky: Buildings provide strong geometric lines. Layer them with clouds, stars, or urban light trails for composites that feel both structured and chaotic.
- The same subject twice: Shoot a portrait, have the person shift position slightly, and shoot again. The resulting image has a ghostly, motion-like quality — one person becoming two, or a figure dissolving at the edges.
Subjects with large dark areas work best as the first layer, because those dark zones leave unexposed film for the second image to fill. Subjects with large bright areas work best as the second layer, where they fill in the shadows of the first. Thinking about the light-and-dark relationship between your two layers is more important than the subjects themselves.
Film Stock Choice
High-contrast films separate the layers more dramatically, while low-contrast films blend them together. Tri-X and HP5 are excellent for black-and-white doubles — their punchy grain and deep blacks give each layer a graphic, defined quality. Ektar 100 produces vivid color doubles with clean separation thanks to its fine grain and high contrast.
Portra 400 gives dreamier, more blended results. The lower contrast and softer tonal transitions let the two layers melt into each other, making it the go-to for portrait-based doubles. CineStill 800T adds its characteristic halation glow, particularly around light sources — doubling exposures with neon signs on 800T can produce images that look genuinely otherworldly.
Common Mistakes
Both layers too bright. This is mistake number one. Two properly exposed bright scenes on the same frame produce a washed-out, overexposed mess. At least one layer needs significant dark areas, or both layers need exposure compensation. If everything is bright, the film gets too much total light and you lose all separation between the layers.
No contrast between layers. Two mid-tone, evenly lit scenes will merge into a muddy, indistinct blur. You need tonal contrast — dark areas in one layer for the other to show through. Without that contrast, the double exposure just looks like a mistake.
Forgetting exposure compensation. It's easy to get caught up in the creative process and forget to adjust your settings. One stop under for each layer. Write it on your hand if you have to.
Not keeping notes. Double exposures involve twice the variables of a normal shot. Which frame was doubled? What was the first layer? The second? How much compensation did you use? Without notes, you can't learn from your results because you won't remember what you did.
Film vs. Digital Double Exposure
You can simulate double exposure in Photoshop — layer two images, set the blend mode to Screen, adjust opacity. Some digital cameras even have a built-in multiple exposure mode. But film doubles are different. The chemical interaction between two exposures on the same emulsion produces tonal blending that's distinct from pixel-based layer math. Highlights interact differently. Color mixing follows the physics of light hitting silver halide.
And there's no undo. No opacity slider, no “let me try a different second layer.” You make two decisions, the chemistry does its work, and the result is final. When it works, you've created something that exists only as that specific negative — a true one-of-one.
Track Your Double Exposures
Because double exposures involve more variables than standard shooting, tracking them is especially valuable. Pellica's film roll tracker lets you note which frame numbers were doubled and record what each layer contained. Log the exposure settings for both layers, note your compensation adjustments, and add a description of each layer's subject.
When the scans come back, match them to your notes and see what worked. Did the silhouette-plus-texture approach produce the layering you wanted? Was one stop of compensation enough, or did the frame come out too bright? Over several rolls, your notes become a personal playbook — a record of which combinations produce results you love and which ones fall flat. Use the light meter to nail your compensation readings, and find a lab that handles your processing with care. Double exposures are experimental by nature, but good data turns experiments into repeatable techniques.